

summary
This article was written in response to the following requests received in the #Summary TFTimes.
In TFT, even with the same configuration, a single “placement” can make a big difference between winning and losing.
In this article, based on the requests we received, we provide a thorough explanation of the concept of placement that is useful in actual competition, from the basic behavior of units to the intent of placement and how to adjust for each face-off.
Why that position? ” to logically understand and increase your win rate!
Contents
This article will proceed as follows:
- Basic Behavior of Pieces
First, we will explain the rules of behavior for attacking, moving, and activating skills of units in TFT.
It is essential to have these basics down in order to correctly understand the intent of placement. - Basic Placement Concept
Next, we will introduce the optimal placement of each unit according to its role (tank, carry, etc.).
We will explain the principles of placement to increase the odds of winning, such as ” protect the carry ” and ” focus. “ - Adjust placement according to the opposition.
If the enemy has Assassins or CC (Cross-Countermeasures), placement needs to be flexible.
In this part, we will show you how to change placement according to the situation with specific examples. - Example of placement by configuration
For those who want to know how to place each actual configuration, here are some individual articles. - Conclusion
Finally, we will review the points conveyed in this article and organize the most important ideas in placement.
1. basic behavior of pieces: attack, movement, and skill
Determination of target of attack
- Unit launches a normal attack on the nearest enemy from you at the start of combat
- If an enemy unit is killed or moves out of range during a normal attack, it will re-target the nearest enemy.
- *If two enemies are at the same distance, the target is determined at random.
Movement rules
- If there is an obstacle (such as a unit), move around it to avoid it
- Assassin-type (e.g., Zedo, Shaco, etc.) approach and attack the nearest enemy after jumping.
- If no enemy is within attackable range, move toward nearest enemy
Skill Direction and Target
- Basically, launch the skill toward the target you are currently attacking
- If the skill description specifies the target or range of the skill, the skill target or range is determined according to that description.
2. basic layout
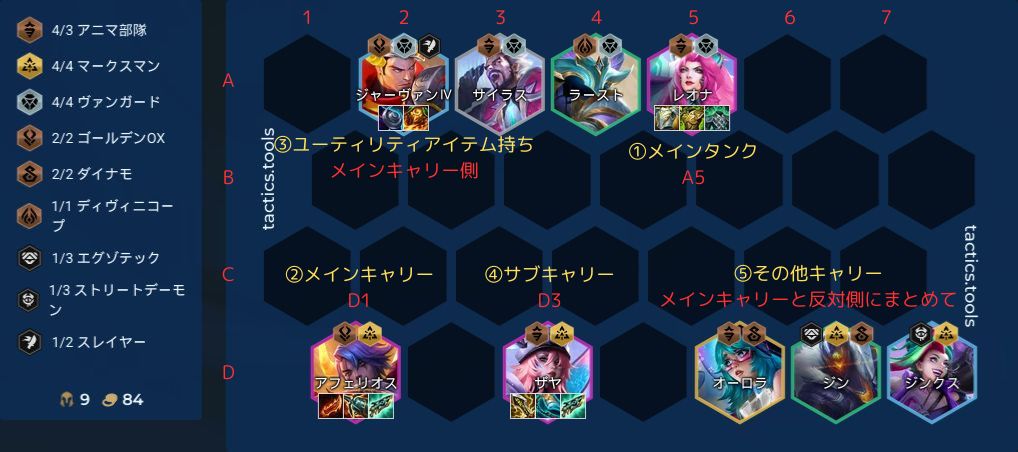
*Wide squares are defined as A-D from the top, and vertical squares are defined as 1-7 from the left.
*The above arrangement assumes the enemy main carry is at the far right.
💡Basic Approach
▪ Increase survival time of allies (especially main carry) to maximize total health and total damage
▪ Reduce enemy survival time by focusing and minimize enemy total health and total damage
(1) Main tank ( A5)
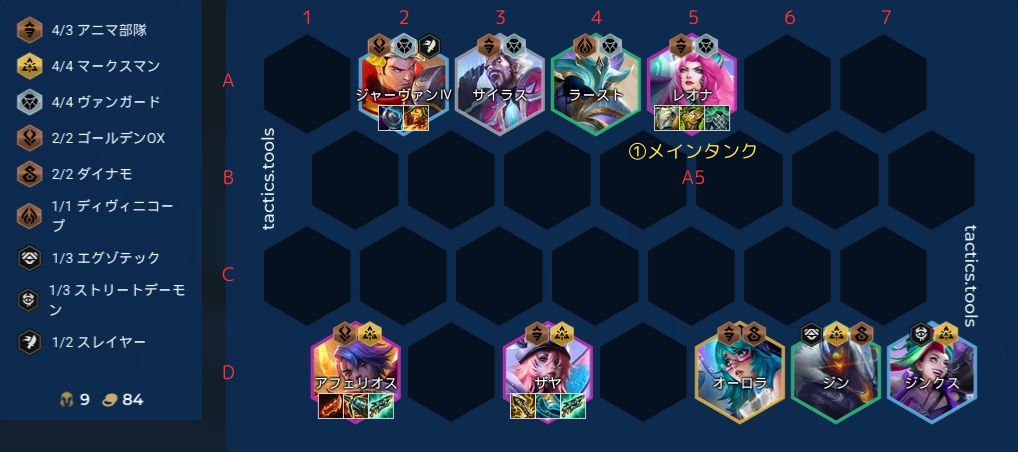
Reason for placement: To prolong the survival time of friendly units by being the first to receive enemy carry attacks.
By placing it in this position, the hardest main tank can be the first to catch the enemy main carry’s attack.
As a result, the survival time of friendly units will be extended, and the total health and total damage of the team as a whole will increase due to the increased number of skill and normal attacks, thus increasing the win rate.
(2) Main carry ( D1)

Reason for placement: To place the main carry furthest away from the enemy and have it survive to the end to earn damage.
The role of the carry is to survive for a long time and continue to produce firepower.
This position will be the furthest away from the enemy’s main carry, making it harder to be targeted, thus increasing survival time.
As a result, the number of skills and normal attacks will increase, improving the total damage of the entire team and the win rate.
(3) Utility item holder ( main carry side)
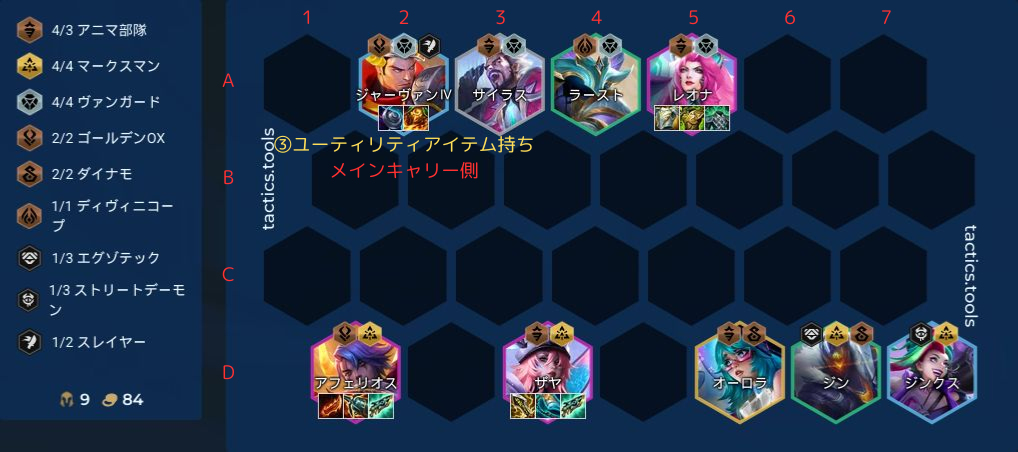
Reason for placement: to give the main carry’s attack target disassembly, shredding, and wounding so that it can deliver damage more efficiently.
The role of utility items is to maximize the firepower of the carry through these effects.
In other words, utility items are the “weapons” of the carry.
If placed in this position, the debuffing of the target will be stable, increasing the total damage of the team as a whole and increasing the win rate.
(4) Subcarrier ( D3)

Reason for placement: To shorten kill time by aligning focus with the main carry, while avoiding simultaneous hit by ranged skills by leaving one square empty.
The role of the sub-carry is to work with the main carry to supplement firepower and speed up kill time.
Placing them in this position increases the speed at which enemy units are handled and reduces the opponent’s survival time, thereby lowering the enemy team’s overall total health and total damage and increasing the odds of victory.
(5) Other carry ( grouped together on the opposite side of the main carry )
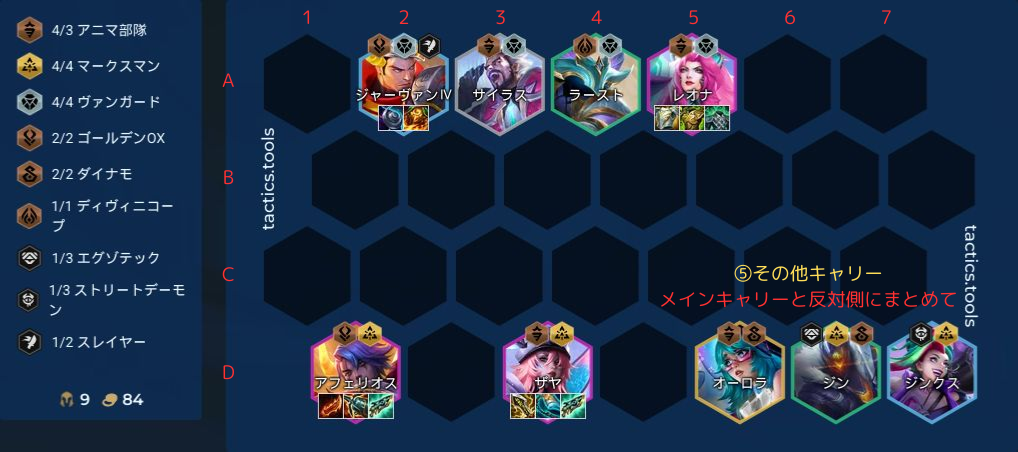
Reason for placement: to keep distance from the main carry and sub-carry to prevent simultaneous hit by ranged skills.
The role of other carries is to survive as long as possible and earn additional damage.
Placing it in this position reduces the risk of being hit by bullets and slightly increases survival time.
This increases the number of skills and normal attacks, which in turn increases the total damage of the entire team and the win rate.
3. adjusting the placement according to the partner
The following are things to be aware of and prioritize in adjusting placement according to the opponent.
Priorities to be aware of in 💡 placement
Avoid Assassins = Avoid CC (blocking action) > Defeat the enemy’s weakest piece first
Avoid Assassins
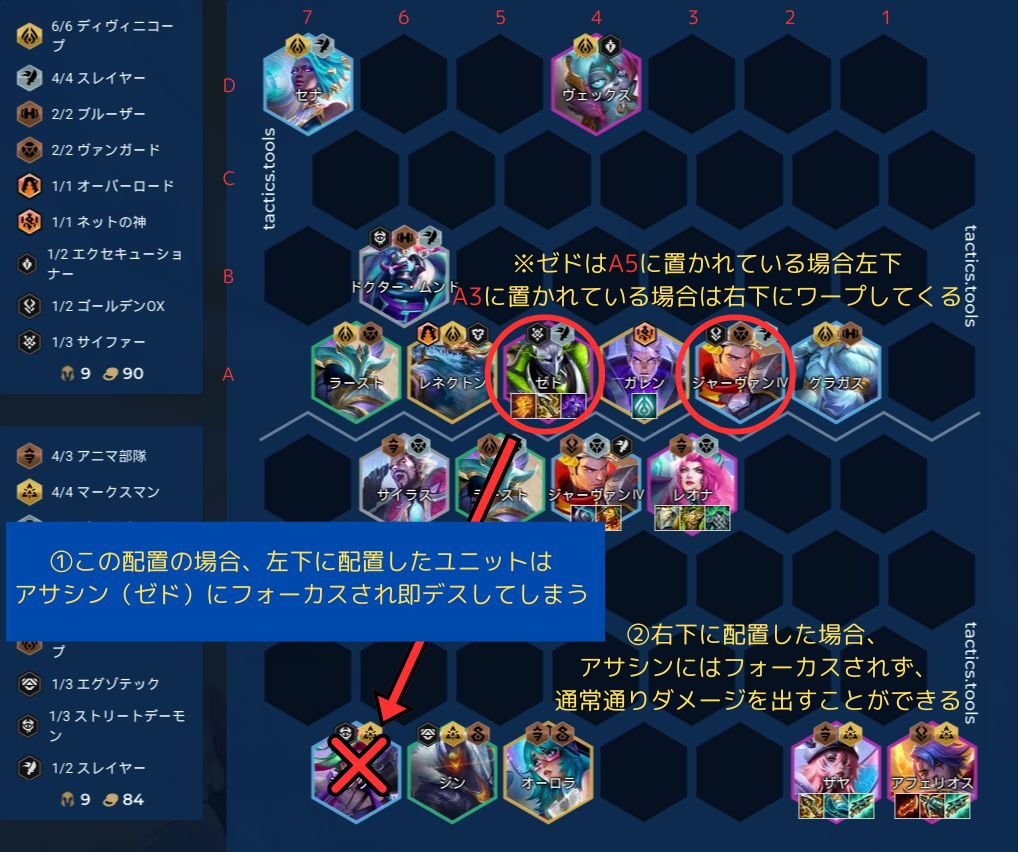
Reason for placement: To avoid instant death by enemy assassins and to maximize the actionable time of the main carry.
In the above image, Zedo is placed at A5, so placing the main carry at the bottom left would result in an instant death.
The most important thing for the main carry is to survive and continuously deal damage.
Therefore, by positioning the team to avoid Assassin’s warp destination, it will be easier to gain more casts and normal attacks, which will increase the total damage of the entire team and the win rate.
Avoid CC (Conduct Interference)
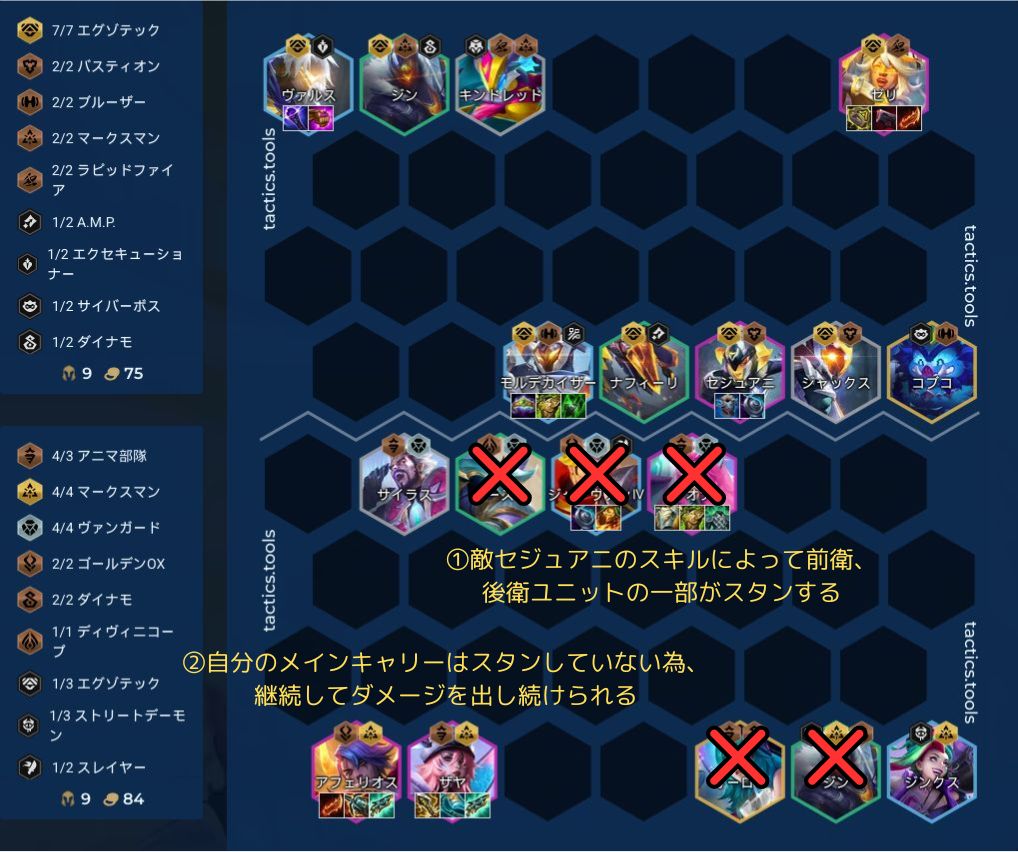
Reason for placement: To avoid enemy range CC (blocking action) and maximize the time available for main carry action.
In the image above, the main carry is placed on the left side, attacking the enemy main tank.
However, when placed on the right side, the main carry is more susceptible to enemy ranged CC and the carry’s out-of-action time increases, effectively shortening its survival time and decreasing total damage.
It is important that the main carry not be stopped in action.
Therefore, by positioning the team to avoid action stoppage as much as possible, the number of casts and normal attacks will increase, resulting in an increase in total damage for the team as a whole and a higher win rate.
Defeat the enemy from the weakest piece.
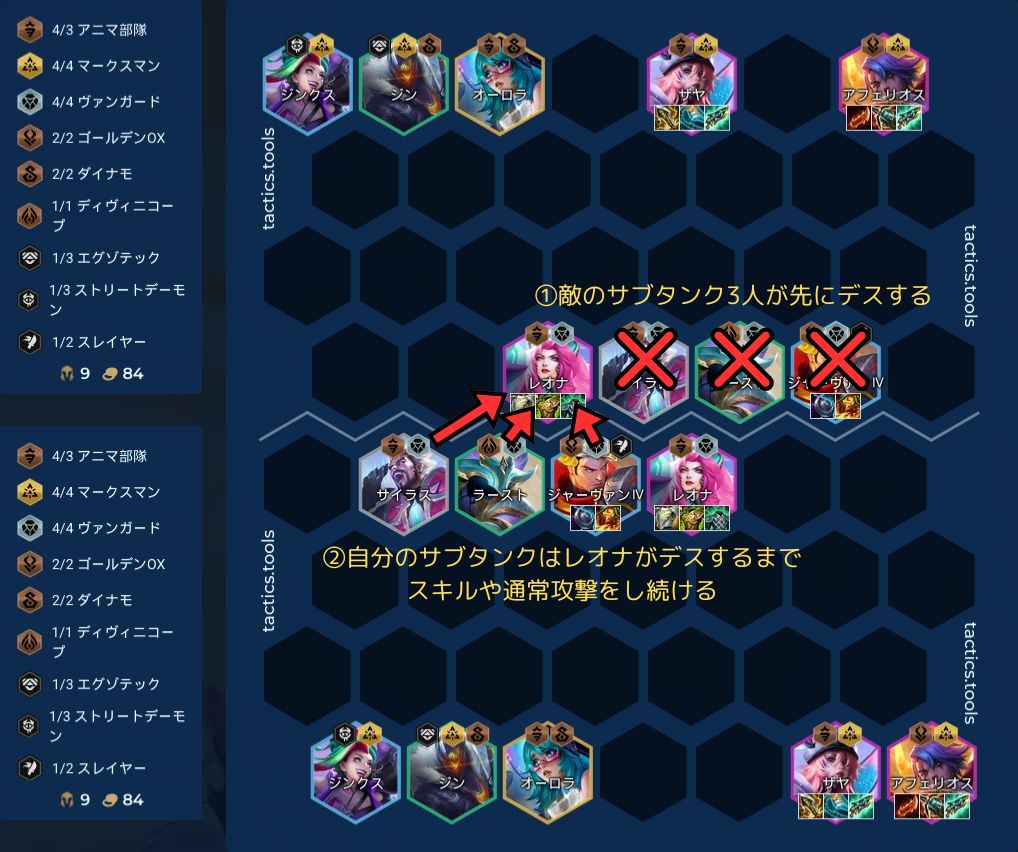
Reason for placement: To reduce the enemy’s overall survival time and total damage by preferentially focusing on the enemy’s weaker units (e.g., sub-tanks) and killing them quickly.
By killing weak units early, the skills (damage, barrier, recovery) and normal attacks that the unit was originally supposed to use can be disabled.
As a result, the total health and total damage of the entire enemy team is reduced, leading to an improved win rate.
4. placement patterns for specific configurations
Placement patterns for each configuration are presented in the following articles
Graves Thrillor:

vs. Graves Thrillor:

Leblanc reroll:
Bastion Morgana:
Anima Unit:
5. summary
Placement” in TFT is more than just positional adjustments; it is part of a strategy that directly affects the winning rate.
In this article, we have explained the concepts that can be used in real games, from the basic behavior of pieces to the placement of pieces by role, and adjustments according to the facing situation.
The three most important points are as follows:
✅ 1. extend the survival time of allies (especially the main carry)
The longer the main carry lives, the greater the number of skills/AAs and the maximization of total damage.
This requires tanks to take on attacks or be positioned to spread out the hits.
✅ 2. focus and deal with enemies quickly
By aligning attack targets between allied carries, the enemy is defeated in a short time, and the enemy’s skill activation and damage amount are reduced.
The winner is determined by the placement of ” who gets dropped first.”
✅ 3. adjust placement in order of priority according to the partner
Depending on the threat of the confrontation, the following order of awareness is effective:
- Avoiding Assassins: Preventing Carrie’s Instant Death
- Avoid CC (Conduct Interference): do not reduce the number of carries.
- Defeat the enemy from the weakest piece: reduce overall firepower by crushing recovery and support.
Just by being aware of these points, even if the composition is the same, a single placement can make a big difference in the winning rate.
We hope that the contents of this article will help you to think about ” Why do we place them in that position? and we hope it will help you in your placement decisions.
We hope that this article will be of help to all beginners and intermediate students,,


コメント