


Article Summary: Kitsunebi Bibi @TFT🦊🔥 (@0kitsunebi) / X
Eye-catching work by mah_pn (@mah_pn777) / X
article
Translator: Scilla (@scilla_tftft) / X
Title: Translation of 15.4b commentary video by Balmyeong (15.5)
URL: Translation of 15.5 commentary video by Balmyeong (15.5)
summary
TFT’s B-patch “15.5” fixed the reroll-only environment and encouraged the return of leveling configurations.
We have translated Balmyeong’s commentary and compiled a detailed rundown of how to run each tier and major configuration. This is a must-see for those who want to win tournaments and ranks in the future.
Contents
System Changes
Lulu’s level removed
- Cog-Mau, Smolder, and Rams no longer level up.
- It is now easier to stabilize as a progressive board, but the potential of the configuration is reduced.
Dedicated power-up removal
- Outstretched arms, fusion dance removed.
- The adjustment directly weakens the 3-cost reroll configuration, and its current potential is greatly reduced.
TIPS
… Ash should be avoided.
- One of the most important changes is the removal of the “effect of increasing the number of arrows depending on the attack speed” that was present in Ash’s skill.
- This is a complete super nerf and I would say that DPS has been cut in half.
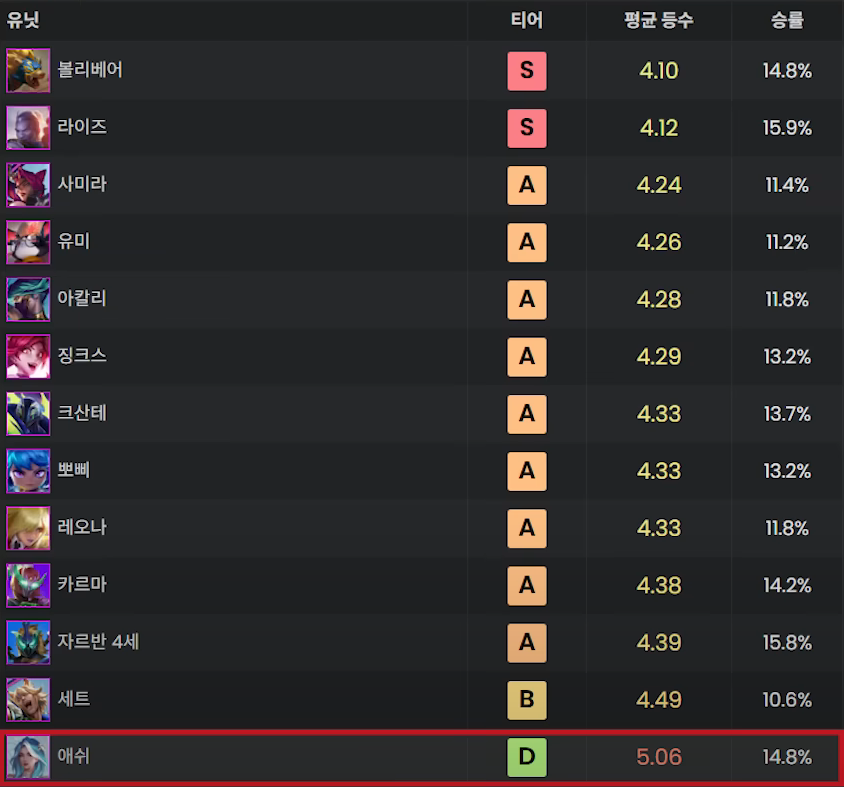
(Ashe’s stats are in the 5-point range…)
Cai-Sa also ended up being weakened.
- Originally weak → Rams nerf further weakened it as a composition.
- It is OK to assume that the entire composition has disappeared.
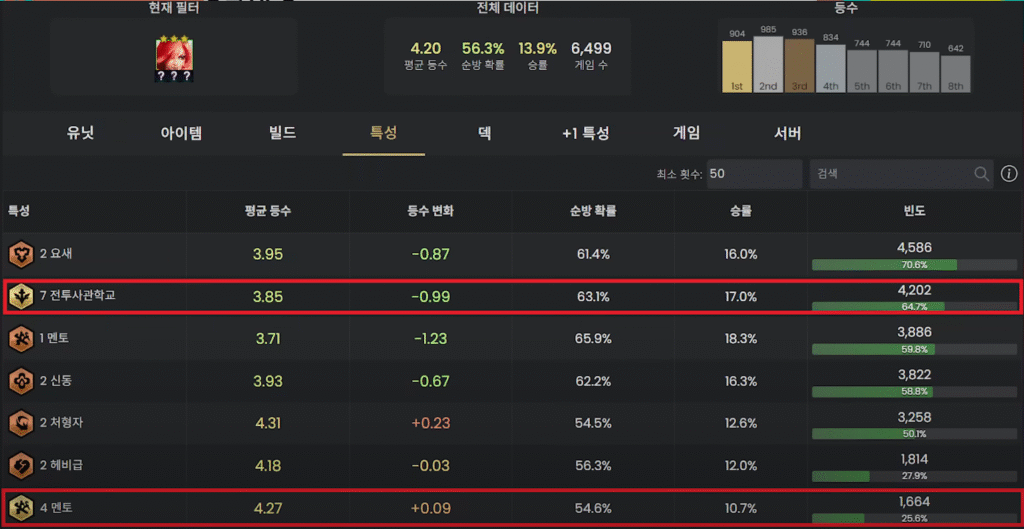
7 Battle Academies are the best for catalina roles.
- 4 mentor is subtle.
- It is usually stronger to aim for 7 Battle Academies.
Hero Augments are all powerful except for Zack.
- Malphite is not totally useless, but can be used to the extent of aiming for top 4.
- Zac is the weakest in the environment and should be avoided at all costs.

300 stacks can be reached with crystal gambits
- Previously, the maximum stack gain was 250 stacks after two double-downs, but now the stack gain multiplier has been increased for stages 3 and 4 of the Crystal Gambit.
- The method is “defeat some enemy units while losing the round (difficult to adjust)” OR “remove the crystal gambit once in stage 2 and activate the synergy again in stage 3”.
From stage 3, the crystal gambit’s stack acquisition multiplier increases.
Using the second method, you can reach 300 stacks just by killing three enemy units in a double-down state; if you keep the crystal gambit until 4-7, you can do it without killing any of them.

I suggest you try it if you choose an economic one for your first augmentation.
If they can get their 10-game losing streak exactly right with Crystal Gambit, and if the 4-1 reroll goes any better, they are almost assured of first place.
It is not recommended for beginners who are not used to shifting configurations, as they will end up taking a lot of damage.
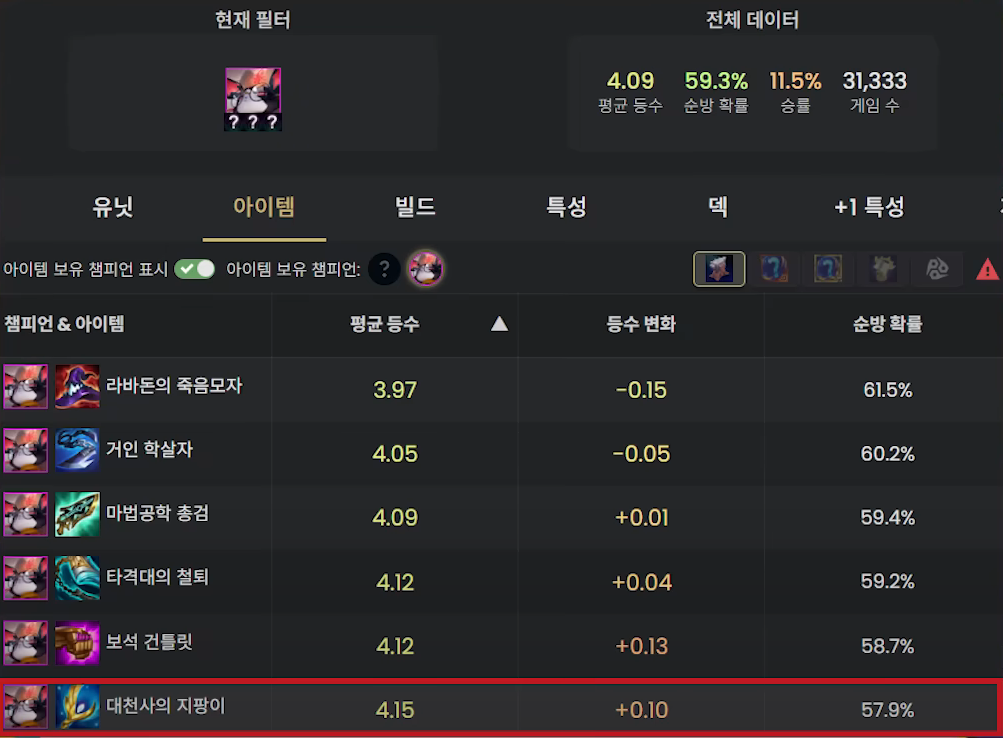
Yumi’s core items changed.
- No arc angel required.
- Nasher Tooth, Giant Slayer, Striker Flail, and Lava Don Death Cap are best suited.
- Artifacts are recommended by Zonya.
Artifact-dependent configuration for easy wins
- Ary + Luden Tempest → Star Guardian configuration. (Staga recommended over Sorcerer)
- Cog-Mau + Dawn Core/Flicker Blade → Stable progression and easy to secure higher positions.
- Galen + Mind/Body Control Pendant → Super powerful on its own. (Can be used in a reroll configuration with Ezreal to aim for 3★)
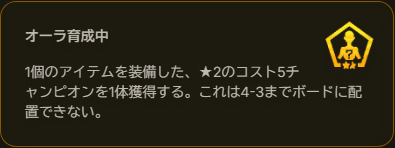
Aura Cultivation” is promoted to the most powerful augment.
- 5 cost ★2 + items provided by 4-3.
- You must take it when you see it.
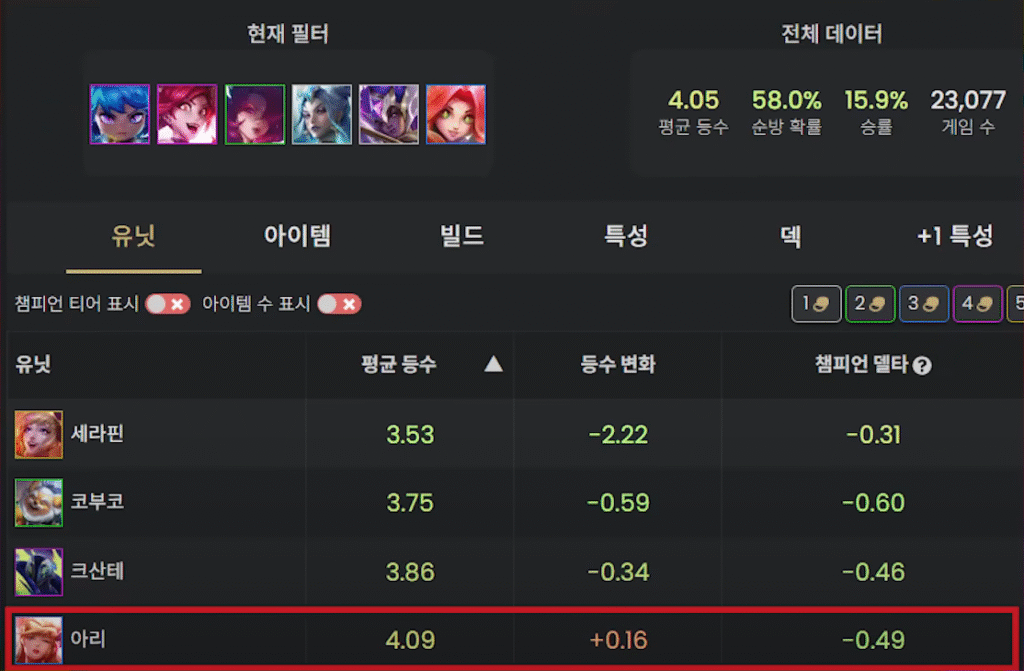
Optimization of Star Guardian configuration
- Ca Sante + Cobco at *2 is more powerful than Ary.
- Since the nerfing of Star Guardian’s high rank effect, Ka Sante and Kobuko are stronger than Arli if they are 2*. (Can even employ both).
Jinx & Poppie’s power-up lottery technique
- Move Star Guardian down to the bench and remove “Star Sailor” from the list of candidates.
- It’s easier to pull off “Unstoppable” and “Sky Piercer.”
Basic Standing
- First Augment Selection
- If you think you can win in a row → Item type
- If winning streak looks difficult → Economics
- Without an economic system, it is very difficult to recover from a losing streak.
- Order of priority of configuration
- AD leveling configuration → Jinx > Samira
- AP leveling composition → Prodigy > Sorcerer > Mentor
- Reroll composition is modest.
- The basic structure is a leveling configuration.
- One and two cost rerolls are acceptable.
- The 3-cost reroll is recommended to be tried only when perfect conditions are met.
Reroll configuration
Tier 1: Cayle Leroll
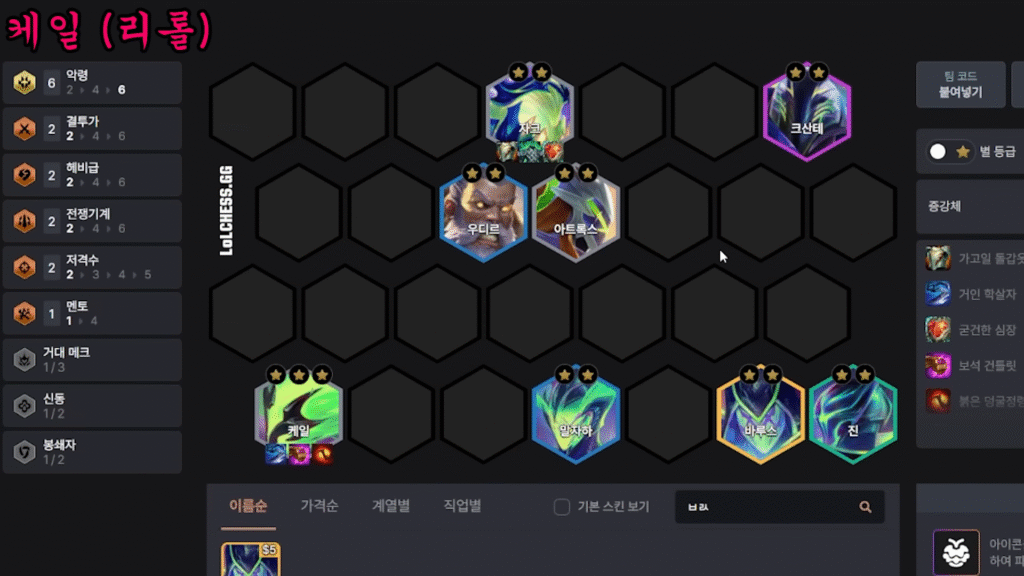
- Current status: the average ranking has actually dropped a bit since the previous patch. (Because of the enhanced leveling structure, it has become more difficult to get through stage 4)
- Playing conditions: 2 or 3 stages to secure economic augments or an encounter with a lot of money.
- Standing: 3-1 to reroll and complete Cale and Zach’s *3 if not too much.
Ideally, you should complete the *3 at 3-1 and maintain the winning streak until at least 4-1, even if you are forced to do so. - After completion: ka sante + 6 lays activated by adding Vals.
- Recommended power-ups: Cale “9000+,” “Hero’s Story,” “Shadow Division,” and “Double Strike.”
Normally, the one-cost reroll configuration is to reroll to 33 gold and continue if more than 7 cards are collected, otherwise, the standard practice is to save 50 gold at level 5.
However, in the current patch, you will lose that approach.
Ideally, you should complete 3★ at the timing of 3-1 and maintain the winning streak until at least 4-1, even if you are forced to do so.
This will give you the strength and financial wherewithal to go for level 9.
Tier 1: Crew

- Current Status: Due to the gin nerf, the stock crew configuration is more powerful than the previous gin-infused version.
- Condition: Aim for Malfite & Sivia when they have a good pull and can make armor items. (Preference is given to armor items over offensive items.)
- Standing: after achieving *3 → Level up and remove the ner and add Rise Jarvan IV, Braum, Twisted Fate.
- Item transfer: Item transfer is not required until Twisted Fate ★2.
- Recommended power-ups:
Malfight: “Transformation” first, followed by “The One Who Stands on His Back”, “Inner Fire”, and “Resistance”.
Sivia: “Sky Piercer” is the first choice.
Sivia is an unconditional “skypiercer” choice. The power of the configuration changes by a factor of 1.5 with or without it.
Tier 1: Zaya Lilor (Bastion 6 Zaya)

- Current: Zaya would like to choose Bastion 6 unconditionally because of the nerfed fanservice.
- Standing: Aim for Shen & Zaya ★3 at level 6. (If you can afford it, collect Swain as well to make him ★3)
Add Jinx after level up. - Item: Bastion has low magic defense → utility-type armor (sunfire cape, ionic spark) is recommended over pure armor.
- Power Up: Zaya “Shadow Division” and “Double Strike”.
The upper limit of the final configuration will be secured by Swain’s ★3.
Tier 1: Cogma urilor

- Current status: strongest among 3-cost reroll configurations. (Very powerful, especially when acquiring artifact items)
- Condition: Avoid if there are more than 2 Star Guardians at the table. (Because without Neeko★3, the potential of the composition will be reduced.)
Neeko★3 is required to aim for first or second place. - Item: Cog-Maw: I want to equip a fixed number of Shozin’s Spears, Guinsaw Rage Blades, and Ark Angel Staffs. (if no artifact)
- Power Up: Insufficient firepower → “Fairy Tail” Insufficient tank → “Care Taker”
Tier 1: Jace & Caitlin (reroll)

- Current status: back in Tier 1 again due to the Jace buff. Caitlin has the advantage in the current meta, which is mainly long-range. Sub-units Leona & Yumi have also been buffed.
- Standing and Placement: For placement, just flip left and right, and basically fix on the left side. (Caitlin’s skill line of fire is easy to pass through, and statistically speaking, left placement is advantageous.)
- Recommended power-ups:
Jace: “9000+”, “The Game is on”, “Trickster”.
Caitlin: “Shadow alteration,” “Efficiency
Leveling Configuration
Tier 1: Star Guardian

- Currently: It is statistically more powerful to employ Ca Sante + Cobco at *2 instead of using Ary.
- Standing: Jinx works well with Shozin’s Contraption.
Star Guardian units tend to be good if they are lowered to the bench before power-up selection. - Recommended power-ups:
Poppy: “Unstoppable
Jinx: “Sky Piercer
Do not make a guin saw rage blade for jinks in the early stages of the game.
In the past, the Guinsaw Rage Blade was a good early stabilizer and not a bad connection to Ash, but now that Ash has been weakened, there is no advantage to stabilizing the early game with the Guinsaw Rage Blade at all.
Tier 1: Soul Fighter

- Currently: To function as a Tier 1, you must have either a crest or a Gwen ( if you don’t have either, you are underpowered). (If either of them can be secured, the composition potential is very high.
- Positioning: It is strong to place Set in the top 1 position. (This is a placement often used in professional tournaments, and the effect can be felt even in the solo ranks.)
- Recommended power-ups:
Set: “Resistance,” “Round 2,” “Self-Renewal
Samira: “On the Edge”, “Shadow Division”, “Double Strike”.
Tier 1: Prodigy Yumi

- Current status: apex of AP leveling configuration.
- Items: lavadondes cap, giant slayer, striker flail, nasher tooth are perfect.
Leona is almost the only tank this season that looks good with a crown guard. - Standing and Notes: heavy wounding effects are essential → recovery inhibition is unconditionally equipped on Malzahar. (Sunfire cape or ionic spark cannot be substituted)
- Recommended power-ups:
Yumi: “Bullet Hell
Leona: “Transformation” or “Resistance
Tier 1: Sorcerer

- Composition policy: Do not make Rise★2, but operate it as a front row tank. Do not use Arri, but employ Kenen as a protector tank → connect to Ka Sante.
- Item Distribution: Karma: Attack AP item. Gwen: recovery inhibiting and magic defense lowering items.
Swain: armor items. Jarvan IV: Mana-based armor item. - Recommended power-ups:
Karma: “Mage” and “Efficiency
Swain: “Resistance
Gwen does not need to be moved due to “Fusion Dance Removal
Mr. Balmyeong: “Never, ever invest your money in that purple bald guy.”
Tier 1: Mecha-Pilot 7

- Playing conditions: recommended to play when Pandora’s bench is secured or when a crest is acquired. (Otherwise, shift at the timing when one Yone naturally appears while rerolling at level 8)
Since 5-cost Yone is required, it is not recommended to aim for it from the beginning. - Utilization of Augments: Once a “mecha pilot” is selected, the second one is fixed to appear. (When a boarding unit has an emblem, the synergy effect is applied to the mech as well, strengthening it.)
Mecha Pilot is for Lucien Senna. Not recommended for Yone or Karma. - Item Distribution:
Karma: Void Staff required (Mecha is magic damage)
Jarvan IV: Mana items
Yone: More fighter items
impression
The environment of 15.5 is dominated by leveling.
In particular, “Star Guardian,” “Prodigy,” and “MechaPilot” have a high win rate and can aim for a stable top position in the case of Kyoyi.
Also check out the Star Guardian’s diverse derivations and power-up changes!
You there who read to the end! Thank you so much !!!!


コメント